Stop Throwing Away Connectors… and Money
If you've done even a handful of fiber installs, you already know the frustration of failed terminations. We've been there, chasing down mystery losses, redoing splices, tossing connectors that should've worked. It wasn't just annoying. It was expensive.
There is a better way.
In this article, we'll break down the two main ways to splice fiber optic cable, mechanical vs fusion, and walk through the tools, the real-world process, and what we've learned after moving fully to fusion. This isn't a classroom guide. It's a field-tested approach from a crew that used to average a 10% failure rate with mechanical splicing… and now goes months without a single failure.
Fusion vs Mechanical Fiber Splicing
What Is Fiber Optic Splicing?
Splicing is how you permanently join two fiber optic cables end-to-end. Unlike terminations with pre-polished connectors or factory pigtails, splicing is all about aligning bare glass fibers with precision, either mechanically or by literally melting them into one continuous piece of glass.
You typically splice when you're finishing a run inside a building, working with armored fiber or pre-pulled bundles, or tying together two segments that can't be swapped out for pre-terminated cables. This isn't repair work. This is how you land runs professionally, at scale.
The two splicing methods are:
- 01Mechanical Splicing: Uses a connector-style sleeve to align and hold fibers together with gel.
- 02Fusion Splicing: Melts two fiber ends together with an electric arc, forming a single optical path.
Both have their place. But they're not equals: not in quality, not in long-term performance, and not in cost once you zoom out.
Mechanical Splicing: Cheap, Fast… But Risky
At first glance, mechanical splicing feels like a no-brainer. The gear is cheap, it doesn't need power, and you can train a new tech in under an hour. Strip the fiber, cleave it, clean it, align it in a sleeve with some index-matching gel, and done.
Mechanical splices are fragile. That gel? It attracts dust. A cleave that's even slightly off will cause a weak signal. We've lived this. In our early years, we relied on mechanical splices for most installs. But once you add up the testing failures, do-overs, and callback labor, the "savings" vanish. On average, 1 in 10 terminations failed inspection or needed rework. That kills your day and your profit margin.
Mechanical splicing has its place, maybe for one-off repairs, temporary solutions, or when you're totally off-grid and need to get something online fast. But if you're doing anything at scale or handing work over to a customer who's going to test it thoroughly, it's a gamble. And gambles aren't great in a mission-critical network.
Why We Switched to Fusion (and Haven't Looked Back)
Fusion splicing isn't just more precise. It's a completely different level of craftsmanship. Using a high-voltage arc, it melts the fiber ends together to form a single, continuous strand of glass. No gel. No alignment sleeve. Just clean, low-loss continuity.
We made the switch after one too many callbacks from failed mechanical terminations. Now, we use fusion exclusively, and our failure rate dropped to near zero. Entire quarters go by without a single issue. Testing is now just a formality.
It's consistent, clean, and honestly… way less stressful. We're not wasting time second-guessing our work. And when a client brings in their own tech or runs their own inspection, we're confident the job will hold up. That kind of reliability builds trust, and trust brings repeat business.
Types of Fusion Splicers (And What We Use)
- 01Core-Alignment: This is what we use. These models use internal cameras to align the actual fiber cores, not just the cladding. It's more accurate, especially on mismatched or real-world cable conditions.
- 02V-Groove / Cladding-Alignment: These align based on the outside of the fiber. They're cheaper, but the alignment can be hit-or-miss.
- 03Cladding + Optical Detection: Mostly phased out now. Rarely used.
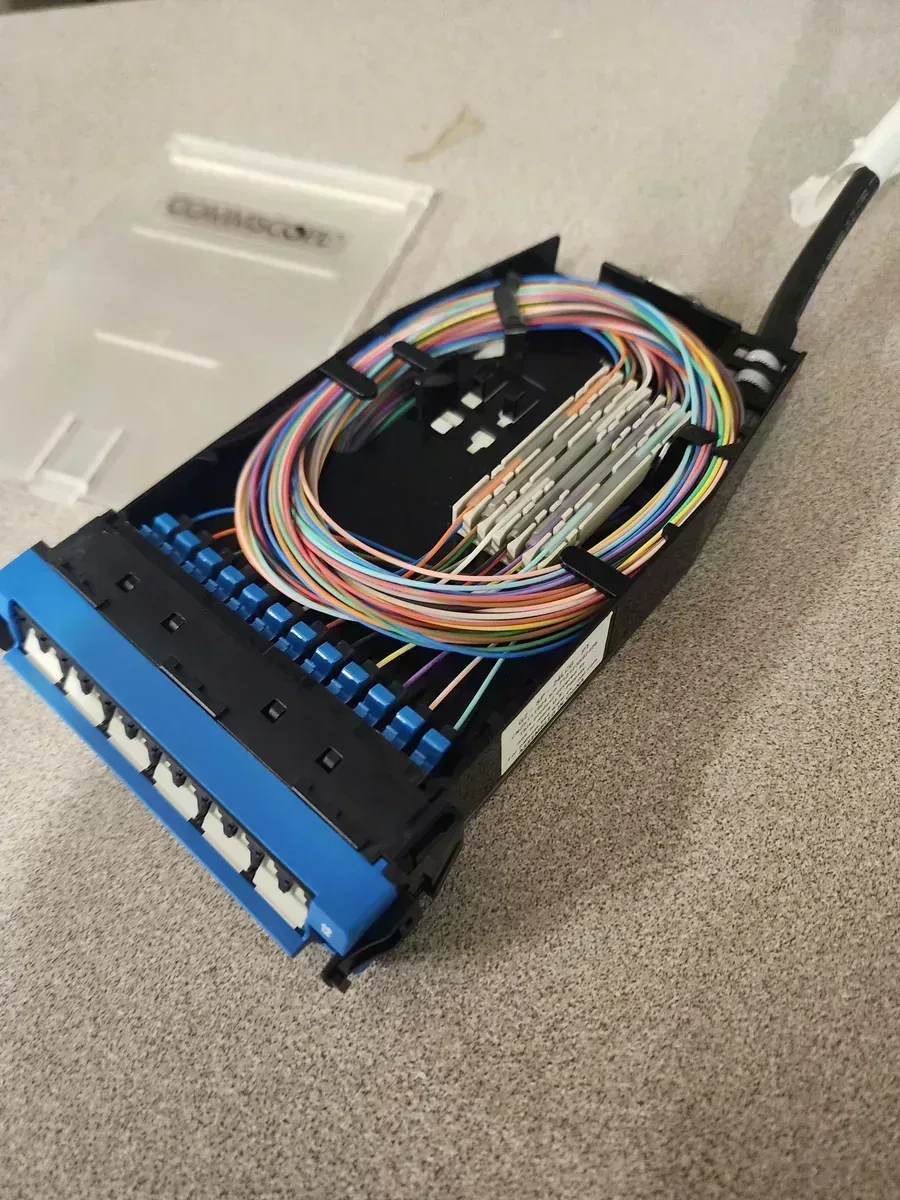
We run with FiberFox gear (splicer, cleaver, and stripper) and we're happy with it. They punch above their price point, and they've got a good working relationship with CommScope, which matters when you're installing matched cassettes and panels.
We also like that our FiberFox Mini 6s+ travel well. If your team is moving between job sites, you'll appreciate the hard case, reliable battery life, and durability.
Let's Talk Cost
A good core-aligning splicer runs $6K to $10K. Add in cleavers, sleeves, consumables, and it's not a small investment. But if you splice fiber even semi-regularly, that gear pays for itself quick. Why? Because callbacks, failed tests, and client frustration cost more.
Mechanical splices cost $10–20 per use (after labor and waste). Fusion sleeves are $1–2. The labor gets faster with practice, and the results speak for themselves.
Only real catch? Power. Fusion gear needs batteries or an outlet. If you're on a jobsite with no power, make sure you've got backup batteries or an inverter. Nothing kills momentum like a dead splicer at 4pm with 50 strands to go.
Also worth noting: clients notice when you're using better equipment. Project managers notice the difference between consumer-grade and professional fusion splicers, not because they care about the brand, but because it signals a contractor who takes the work seriously.
Our Fusion Splicing Process (Start to Finish)
This is how we actually splice: real-world steps that work on risers, closets, ladders, and patch panels. These steps line up with industry best practices, but we do it our way, and it's rock solid.
- 01Strip the Outer Jacket: On armored fiber, we use an MC stripper to remove the aluminum armor. Strength members are cut back and tucked clean. For loose tube or riser, it's quicker, but you still have to be careful not to nick the fibers.
- 02Manage Buffer Tubes & Plan Your Slack: We strip back the buffer tubes just enough to land cleanly into the tray or LIU. Always leave slack, enough for maintenance later, but not so much it turns into a rat's nest.
- 03Strip, Clean, Inspect: Each individual fiber is stripped using a FiberFox stripper, wiped with 99% alcohol, and scoped to confirm it's spotless. This step is tedious, but it prevents so many failures it's worth every second.
- 04Cleave the Fiber: We cleave each strand using a precision FiberFox cleaver. It holds angle and depth better than most of the knock-offs we've tried. A bad cleave is the #1 reason for a failed splice. Don't skimp here. Thankfully, splicers make it pretty obvious that your cleave was bad.
- 05Align & Fuse: Fibers go into the FiberFox core-alignment splicer. The machine aligns the cores, fires the arc, and gives us a loss measurement. If the loss is out of spec, we clean and retry. But honestly, that's rare.
- 06Apply Heat-Shrink Protection: We slide the splice into a protective sleeve and shrink it with the built-in oven. Let it cool completely before routing. Rush this and you'll deform the glass or over-bend the jacket.
- 07Route to Tray or Terminate: Finished splices go into the cassette tray or splice holder. If we're using splice-on connectors, we terminate and connect right away to the adapter panel.
Dirt Is the Enemy (Seriously)
You can follow every step perfectly and still fail inspection… because someone touched the connector with their finger. Or dropped it. Or set it down on a dusty rack shelf.
Even one speck of dust can scatter the light and wreck your signal. A single piece can obscure most or all of the core on a single mode fiber.
Our rules: clean every surface. Use fresh wipes. Cap everything not in use. Inspect every connection before plugging it in. Never blow on a fiber. Don't let your apprentice do it either.
We even go so far as to wipe the connector tip twice before final insertion. Overkill? Maybe. But we don't fail tests anymore.
Our Advice? Go Fusion or Go Home
If you're pulling fresh fiber, whether it's new construction or cleanup after someone else, fusion is the move. It'll save you hours of troubleshooting and make your work more professional. You'll get fewer callbacks. You'll stop tossing connectors.
And you'll stop throwing away money.
Final Thoughts
Splicing fiber isn't magic, but it's not casual either. You need clean habits, good tools, and a reliable process. Get all three, and fiber becomes one of the cleanest, most reliable, and most profitable parts of your projects. To understand how spliced runs fit into the bigger picture, our guide on the parts of a fiber optic network covers connectors, transceivers, LIUs, and testing equipment.
Still on the fence? Try this: rent a fusion splicer, splice a dozen connections with each method, mechanical, half fusion. Measure the loss. Track your time. Then see which ones pass testing without touch-ups.
We did. And that's why we never looked back.
Frequently Asked Questions
Frequently Asked Questions
Mechanical splicing uses an alignment sleeve filled with index-matching gel to hold two cleaved fiber ends together. Fusion splicing uses an electric arc to melt the two ends into a single continuous strand of glass. Fusion splicing produces lower insertion loss, typically 0.1 dB or less versus 0.2-0.5 dB for mechanical splices, and is far more reliable in long-term commercial installations.
A core-alignment fusion splicer runs roughly ,000 to 0,000 for professional-grade models from brands like FiberFox, Sumitomo, and Fujikura. Cladding-alignment models are cheaper but less accurate. The cost pays back quickly for contractors who splice fiber regularly — callbacks and rework from mechanical splice failures cost far more over the life of an install.
The three most common causes are a bad cleave (fiber end face not perpendicular), contamination (dust or oil on the fiber before splicing), and a mechanical splice's index gel degrading over time. Fusion splices can fail during the arc cycle if the machine's electrodes are worn or if alignment is off, but modern core-alignment splicers detect and report this before the splice is completed.
A core-alignment splicer uses internal cameras to align the actual glass cores of both fibers before firing the arc. Cladding-alignment splicers use the outer diameter of the fiber as a reference point, which is less accurate because fiber cores are not always perfectly centered. Core alignment produces more consistent low-loss results, especially when splicing different fiber batches or after cable damage.
Wipe each fiber end with a lint-free wipe saturated with 99% isopropyl alcohol, then inspect with a fiber scope before proceeding. Do not blow on a fiber end — breath moisture and particulates cause more contamination than they remove. Cap every connector and fiber end that is not actively being worked on, and avoid setting exposed fiber down on work surfaces.
Fusion splicing is the right choice for permanent commercial installations, backbone runs, and any project where a customer will test the fiber or require documented loss measurements. Mechanical splicing is acceptable for emergency repairs, temporary connections, or field situations where power is unavailable and a permanent fix can wait. For anything that gets installed in a wall, conduit, or splice enclosure, fusion is the professional standard.
An OTDR (Optical Time Domain Reflectometer) sends a light pulse down a fiber and measures reflections to locate splices, connectors, and breaks — and to measure the insertion loss at each point. It is the standard tool for certifying fiber runs after splicing. Without an OTDR, you cannot verify the quality of each individual splice or locate a problem splice in a multi-splice run. Fluke Networks' OptiFiber Pro is widely used for commercial fiber testing.
Need Structured Cabling in Tampa Bay?
TSS USA installs Cat6 and Cat6A in commercial offices, warehouses, and medical facilities across Tampa Bay. Licensed, permitted, and documented.
Request a Cabling Quote